Using the principles learnt in the Creating Old World Mods tutorial, this tutorial will take you through some map related stuff. We will cover some XML to set map sizes and using the map editor to create basic maps.
First thing we will address is map sizes. It may change in the future, but presently the default map sizes in game are:
We are able to define our own map sizes. The important question we need to ask is, how big can we make the map?
For this we need to look at the coding. The map data is stored in a List of tiles. Each tile has an ID defined, which is a short. Here is where we can determine how many tiles are possible in the game. A short has a range from -32678 to 32767. Since we need to maintain positive ID numbers that means our map size can be a maximum of 32678 (including 0). So as long as width * height is not greater than 32678 the map will be loaded.
But this creates other considerations. Should you have a map that big. That much data is going to have a massive load on RAM usage. Plus also, the 3D engine needs to do a lot of processing, which uses a lot of power and generates a lot of heat.
There is also the consderation of how many turns it would take to cross the map. As an example, if a unit can move on average 2 tiles per fatigue point, and a unit has 3 fatigue points. It's going to take 40+ turns to cross the map. And in a 200 turn game, that just seems a bit crazy.
But, I'm sure there will be folks out there making use of every single tile they can. Just HEED THIS WARNING:
USING MAPS OF EXTREME SIZES HAS SHOWN TO CAUSE INSTABILITY IN THE GAME AND MAY RESULT IN WIERD THINGS IN GAME.
Don't come whinging to me. :)
So in mapsizes.xml you can define a mapsize:
    <Entry>
        <zType>MAPSIZE_MAXMAP1</zType>
        <zName>Max Maps 1 (256x128)</zName>
        <iWidth>256</iWidth>
        <iHeight>128</iHeight>
        <iMaxOpponents>9</iMaxOpponents>
        <iVP>300</iVP>
    </Entry>
    <Entry>
        <zType>MAPSIZE_MAXMAP2</zType>
        <zName>Max Maps 2 (100x100)</zName>
        <iWidth>100</iWidth>
        <iHeight>100</iHeight>
        <iMaxOpponents>7</iMaxOpponents>
        <iVP>200</iVP>
    </Entry>
    <Entry>
        <zType>MAPSIZE_MAXMAP3</zType>
        <zName>Max Maps 3 (125x125)</zName>
        <iWidth>125</iWidth>
        <iHeight>125</iHeight>
        <iMaxOpponents>8</iMaxOpponents>
        <iVP>250</iVP>
    </Entry>
    <Entry>
        <zType>MAPSIZE_MAXMAP4</zType>
        <zName>Max Maps 4 (150x150)</zName>
        <iWidth>150</iWidth>
        <iHeight>150</iHeight>
        <iMaxOpponents>9</iMaxOpponents>
        <iVP>300</iVP>
    </Entry>
    <Entry>
        <zType>MAPSIZE_MAXMAP5</zType>
        <zName>Max Maps 5 (200x163)</zName>
        <iWidth>200</iWidth>
        <iHeight>163</iHeight>
        <iMaxOpponents>9</iMaxOpponents>
        <iVP>300</iVP>
    </Entry>
Note: iMaxOpponents = number of opposing nations to try to fit on this map size. iVP = the weighting to put onto the VP required to win calculation, the higher this number the more VP points required.
The above xml configures a number of >Huge map sizes, including a max size and close to max size map. This xml goes into mapsizes-add.xml in a mod and once active the map selection screen looks like below.
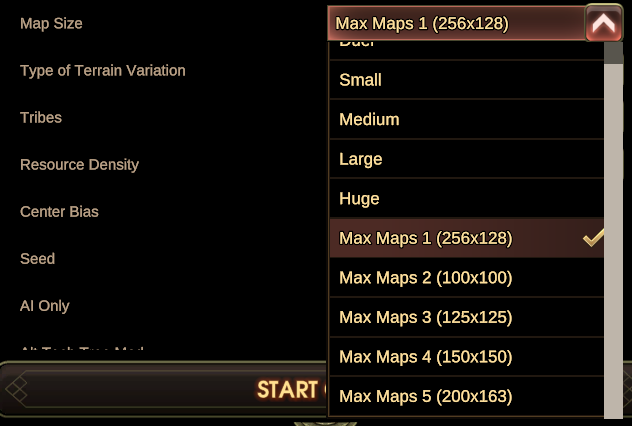
If for example you selected Max Maps 1 you would get a map similar to below.

Click for full size image
Now that we've worked on map sizes, let's look at our next topic.
Old World comes with a built in map editor. To access the editor look in the Tools menu. Once in the map editor you are presented the following screen.

Click for full size image
Each section of the editor has a specific purpose:
1. The individual tile options available to paint onto the map.
2. The tools menus (terrain, height, resources, vegetation, improvements, territories, name).
3. Set the map size here.
4. Generate random map from map script to fit your selected map size.
5. The projector is a special tool which allows you to project an outside image file (such as satellite photo or terrain map) onto the map canvas.
This tutorial is really about creating basic maps and getting you started, so we will be focusing on the simple bits. To create a basic map for Old World, you just need to set the map size then start at tool 1 and work your way down.
Unselect the "Auto Size" button to be able to edit the width and height of your map. Click the "Center Dimensions" to ensure your map will be in the middle of the map canvas.

Choose the terrain you want to paint, use the +/- buttons to change the brush size, then paint on the map canvas. Continue until all of your map is covered with terrain. Note that water must be placed as well as land. Add some urban areas too where you want the city sites.

Use the height tools, add some hills, mountains and oceans. Make sure to use coastal tiles as the transition from land to ocean.

Once you have the basic structure of your map, it is time to add resources and vegetation elements. Remember to space them out so that each player will have access to a couple, but not all.

This step is one of the most important for the whole map creation process. You now need to place City Site improvements on your urban areas so that the game knows where each city site is. In the Improvements menu select the City Site improvement. Place it ONCE in each urban area. Continue until every city site is place.

Once you have allocated city site tiles in each urban area, your map is ready to play! You can save it, then when starting a new game select Premade Map and choose your map.
But what happens if you need to allocate ownership and start locations for the various nations? Well that's where the last two tool menus come in. You can allocate city sites to any nation or tribe. Assign a Player Start to force the player to start on that city site, no matter what nation they pick.
Finally, you can name map elements using the Name menu. Type in what you want the map element named, and then click on the tile to name.

Now that you have completed your map, save it. Then start a new game and play on your magnificent creation!

That concludes this tutorial. You should now be able to create basic maps in Old World and also different sized random maps.
Maps, Maps and Maps - 26 June 2020